What lurks beneath?
Constructing a flat concrete floor
For larger concrete installations, a floor flatness (FF) number is specified to indicate the required slab flatness. FF numbers can range from 20 to 150, with higher values indicating a greater degree of flatness. A concrete slab for a commercial office space may only require a FF of 30, whereas a concrete slab for a TV studio or narrow aisle warehouse requires a FF number approaching 100. Unfortunately, a concrete slab constructed to a specified FF number may not meet the sub-floor tolerance outlined in ANSI A108.02, at the time of the tile or stone flooring installation.
ASTM E1155, Standard Test Method for Degerming FF Floor Flatness and FL Floor Levelness Numbers, prescribes the measurement of FF numbers within 72 hours of concrete placement. However, a floor that is measured or verified as flat at 72 hours does not remain flat. The residual moisture in concrete after placement will bleed to the concrete’s surface and evaporate if uninhibited by a curing membrane. As evaporation and slab drying occurs, the concrete slab shrinks and curls. The deformation is most pronounced at slab edges and construction joints. Consequently, the measured flatness within 72 hours will not be accurate after weeks and months of drying, particularly when the tile contractor is ready to start floor installation. Upon understanding concrete shrinks and curls after installation and does not remain flat, a design professional could attempt to solve the problem by simply specifying a higher FF number than normally required for the project.
FF number conundrum
As mentioned, ANSI A108.02 prescribes sub-floor surface variation for large-format tiles no greater than 3 mm in 3 m and no more than 1.6 mm in 0.6 m (0.06 in. in 2 ft), which is determined by measuring the gap between the substrate and a 3-m straight edge. There is no exact correlation between FF numbers and straight edge measurements, but accepted industry correlations indicate a floor constructed to a FF number of 50 approximately equates to a measurement of 3 mm in 3 m, and a FF of 100 is around 1.6 mm in 0.6 m.
So, based on the approximate relationship between FF numbers 50 and 100, and straight-edge measurements, one could assume there should not be any sub-floor flatness issues at the time of installation. While this is true theoretically, concrete drying shrinkage as previously described, will likely curl the slab out of spec for flatness even if FF is high.
Another concern with specifying high FF numbers is the concrete slab’s installation cost. The degree of floor flatness is a function of the finishing methods, tools, and precision employed by the concrete contractor. A hand-trowelled concrete garage floor will not be as flat as one finished with a mechanical trowel. The former is cheaper to install. Consequently, achieving high FF-numbered floors will be costly (Figure 2).
A better approach to substrate flatness
Achieving a substrate that remains flat until the time of tile installation is a challenge. Concrete drying shrinkage and the accompanying slab curl is almost a given. The money spent on initially achieving a high FF number, high precision floor would be better spent on addressing floor flatness requirements through the installation of a self-levelling cementitious underlayment (SLU), at a lower cost, and with a higher degree of flatness.
As a guide to SLU selection and specification, as well as product installation, two new ANSI standards are pending, with likely publication later this year:
ANSI A118.16, Flowable Hydraulic Cement Underlayment/Self-leveling Underlayment; and
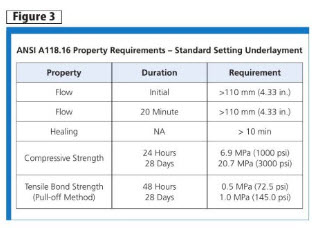
ANSI A108.21, Interior Installation of Flowable Hydraulic Cement Underlayment/Self-leveling Underlayment, (Figure 3, page 28).
Some important elements of the proposed product standards are:
only applicable to tile and stone installations;
covers standard and rapid-hardening formulas;
≥ 20.7 MPa (3000 psi) compressive strength required for all formulations; and
must be rated for Extra Heavy Service in accordance with ASTM 627, Standard Test Method for Evaluating Ceramic Floor Tile Installation Systems Using the Robinson-type Floor Tester.
Also, the currently proposed installation standard provides specific instructions when floor levelling, not just floor flattening; is required.
When substrate levelling to designated elevations is required on a project, this intent needs to be clearly specified along with tolerances. Substrate levelling requires extensive surveying and additional costs in labour and materials. Levelling may not be plausible for the project due to adjacent finishes and/or passageways, especially in remedial work. SLU mortars may not achieve a level surface without additional pinning, preparation, and labour. It is advisable to consult the SLU manufacturer for specific recommendations not addressed by this standard.
More mortar leads to problems
Instead of using a self-levelling cement underlayment for the purposes of truing a floor prior to the tile installation, a contractor may choose to utilize the tile setting mortar for flattening and tile setting. The intent is to save time, money, and labour by eliminating SLU. This tack is acceptable for a substrate that is within the tolerance of ≤ 3 mm in 3 m. However, using mortar to flatten substrates 3 mm in 3 m should be avoided.
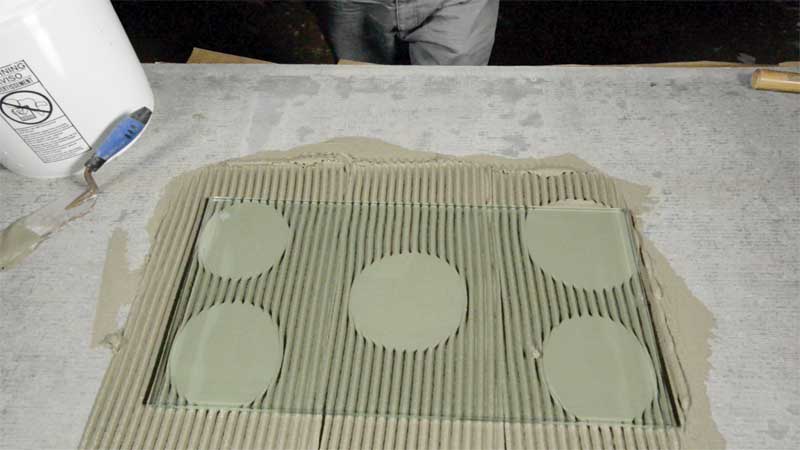
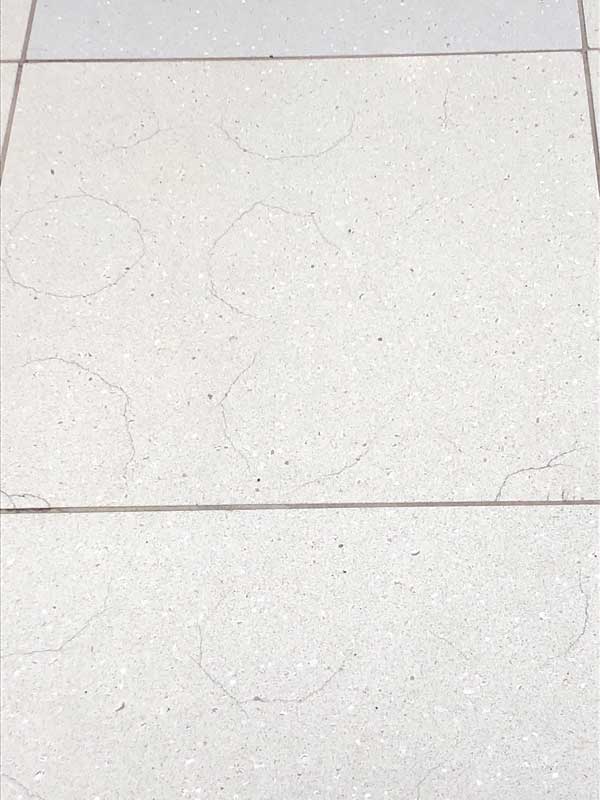
ANSI A118.4, Modified Dry-set Cement Mortar-2019, and A118.15, Improved Modified Dry-set Cement Mortar-2019, establish maximum mortar thickness for large and heavy tiles (LHT) at 13 mm (0.5 in.) after tile embedment. Applications exceeding this value because the mortar was used to flatten the floor, and adhere and support the tile, causes mortar shrinkage. As the adhered mortar shrinks, it can pull the tile with enough force to crack or deform it. Spot bonding of cementitious mortars, an installation method not endorsed for floors by the Terrazzo, Tile & Marble Association of Canada (TTMAC) or ANSI A108, A118, and A136, will contribute to excessive mortar thickness and shrinkage (Figure 4).
Dabbing mortar randomly, instead of unidirectionally combing or trowelling utilizes less time, material, and labour. So, spot bonding is done to cheapen an installation. More often though, it is used to correct uncollapsed mortar ridges and insufficient mortar coverage because the substrate was not flattened first with SLU before the mortar was applied (Figure 5).
Sign up for our weekly newsletter
Construction Canada weekly newsletters give the latest AEC industry news for those who build, design, engineer, specify, renovate or operate in the built environment.
Products & Services

Read the Latest Issue