Polished concrete: Closing the expectation gap
Colour variation
Colour variation in a concrete slab can occur for several reasons and can detract from the overall look of a polished floor.
Materials used for making the concrete can lead to inconsistencies in the final look of the slab if care is not taken to ensure all loads have the exact same materials. The floor slab can exhibit colour variation if batches vary. Supplemental cementing materials such as slag or fly ash can also lead to colouration issues with the surface of the slab.
The concrete slab for polishing specification can include instructions stating one must obtain each colour, size, type, and variety of concrete material and mixture from a single manufacturer with the resources to provide cast-in-place concrete of consistent quality. This source-limitation requirement is similar to the one specified for architectural cast-in-place concrete. Many ready-mix suppliers have quality control (QC) systems at both batch plant and field delivery that, if required, can be implemented into the floor pour plan to provide batch consistency.
Concrete mix design
While a review of the ingredients for a polished concrete mix could be a discussion on its own, two main points to consider are:
- maintaining a water/cement (w/c) ratio of 0.45 (keeping this ratio low helps avoid problems with cracking); and
- allowing zero or limited replacements for Portland cement (e.g. slag and fly ash) as supplemental cementing materials can affect colour and curing (For more information, read Paul Jeffs’ article, “Producing Quality Polished Concrete Floor Slabs,” in the May 2016 issue of Construction Canada).
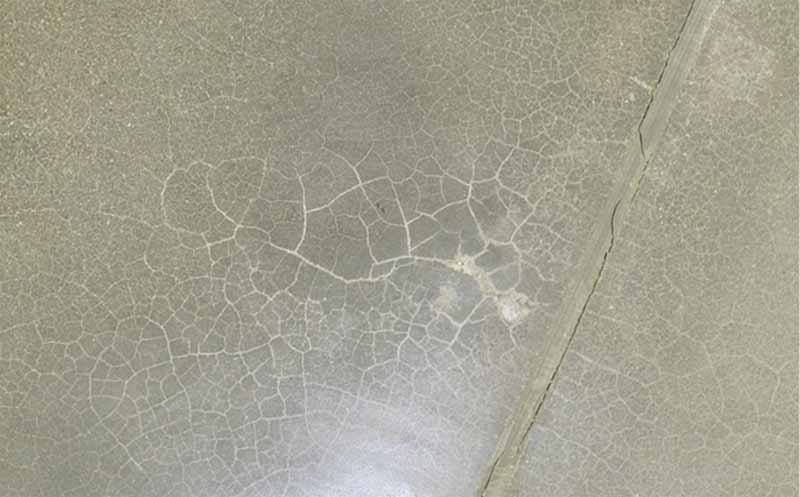
In this author’s experience, a common issue is colour differential in areas such as the perimeter of a slab, cold joints (where a pour ends and a subsequent pour starts), and slab penetrations. The reason for this differential is relatively simple. Finishing operations on the main body of the floor slab are carried out with a large ride on a trowel machine. This creates a consolidated dense surface. If perimeter areas and cold joints are finished by hand, they have a different density and show up as lighter than the main body of the floor. Even after grinding and polishing, this colour difference shows through (Figure 1).
The specification should outline how machine and hand-finishing methods will be used and mandate the discussion of those techniques at a pre-pour review. For example, the specification can say, “Machine trowel the slab edges as close as possible to walls and columns. Minimize hand finishing.”
The document should also outline the finished slab surface shall be free of trowel/burn marks and mottling as this will affect the uniformity of the final appearance. The strategies to achieve this should also be reviewed at the pre-pour meeting.
Image courtesy Consolideck
Colour variation can also result from the way a concrete slab is cured. Sometimes referred to as hydration marks, the discolouration of the slab is usually the result of inconsistent curing methods or material application.
In a ‘wet’ cure scenario, hydration marks show up as lines or pockets of dark and light. This is caused by either a lack of water at the time of covering material application or by failure to place the material flat and free of air pockets. Colour variation can also occur if the curing covering material is disturbed or blows away partially during the slab hydration period.
Curing a concrete slab with film-forming liquids can cause colour problems if the film application is not done with care and consistency. When the application of a curing membrane is uneven, the resulting concrete floor can exhibit a permanent spotty or ‘leopard’ appearance (Figure 2).
Further issues can result from leaving concrete machine tools on the slab after finishing (e.g. the dreaded ‘helicopter mark’). Additionally, the early placement of construction materials can leave hydration marks where skids or wood cribbing interfere with or disrupt the hydration/curing of the slab. It should be noted the hydration marks developed during the curing process are permanent and cannot be removed by grinding and polishing.
It is necessary for the slab-polishing specification to outline the curing of the concrete floor and the method to be used with emphasis on the need for consistency. It must also include the requirement of not storing construction materials on the surface. This author’s experience indicates employing a moisture-retaining cover for seven to 10 days is the optimal way to cure newly placed concrete meant for polishing. This method reduces shrinkage and map cracking, helps concrete gain strength, and eliminates the addition of chemicals that could impede densification or the introduction of colour.
Sign up for our weekly newsletter
Construction Canada weekly newsletters give the latest AEC industry news for those who build, design, engineer, specify, renovate or operate in the built environment.
Products & Services

Read the Latest Issue