
How to install locks on barn-style doors
Installation
Step 1: Ensure the optimum opening
First, determine the wall conditions. These instructions apply to gypsum board with or without standard trim casing; they even work for slim trim casing and moulded jamb casing with an uneven surface. Gypsum board partition openings, jamb casing and width, wall thickness, and stud placement impact the position of the lock, and how deep it is set.
Next, perform a jamb measurement for proper lock installation and backset. This is crucial prep for lock drilling and installation. Standard door openings feature two wood studs behind the gypsum board or trim casing; this determines lock and strike prep and installation points. Before beginning installation, measure any casing on the door opening to determine the placement and size of lock.
For gypsum board partition openings with no trim casing, the author recommends drilling a hole in the wall with a minimum of 25 mm (1 in.) from the centre of the lock bolt to the edge of the gypsum board, subject to the overlap size (Figure 2).
For gypsum board partition openings with trim casing, the lock can be positioned in the most esthetically pleasing position on the trim in the range of 25 to 57 mm (1 to 2 ¼ in.) from the centre of the lock bolt to the edge of the wall, subject to the overlap size. For openings with narrow casing (less than 41 mm [1 5/8 in.]), the lock should be installed next to the trim casing, a minimum of 57 mm from the edge of the wall, subject to the size of the door overlap (Figure 3).
Step 2: Consider the overlap
For the purpose of this article, “overlap” refers to the width of the door overlapping the wall when the door is fully closed. With this type of barn door lock, a minimum overlap is required to ensure alignment and stability for the door; it is also needed to provide enough structure to install the strike properly.
Overlap dimensions are critical for the lock to align properly with the strike installed in the door. Without sufficient overlap, there will not be enough room to install the strike inside the door.
For a standard gypsum board partition opening, a minimum 50-mm (2-in.) overlap is recommended. The author suggests the same for openings with a casing width of 41 mm or wider. While there is no restriction on the maximum overlap, the maximum distance for installing the lock from the edge of the wall is 63.5 mm (2 ½ in.). For wider distances, extended fixings can be requested but wall stud conditions must be checked to ensure more than two studs are stacked at the opening jamb inside the wall. For openings with a casing width of less than 41 mm, a minimum overlap of 82.5 mm (3 ¼ in.) is advised (Figure 4).
Step 3: Install the lock
Before installing the lock, determine the gap between the wall and the door.
This gap varies from door to door, but typically ranges from 9.5 to 13 mm (3/8 to ½ in.). If necessary, install a 6-mm (¼-in.) spacer into the lock recess before inserting the lock itself, which can accommodate a gap of up to 19 mm (¾ in.) between the door and the wall.
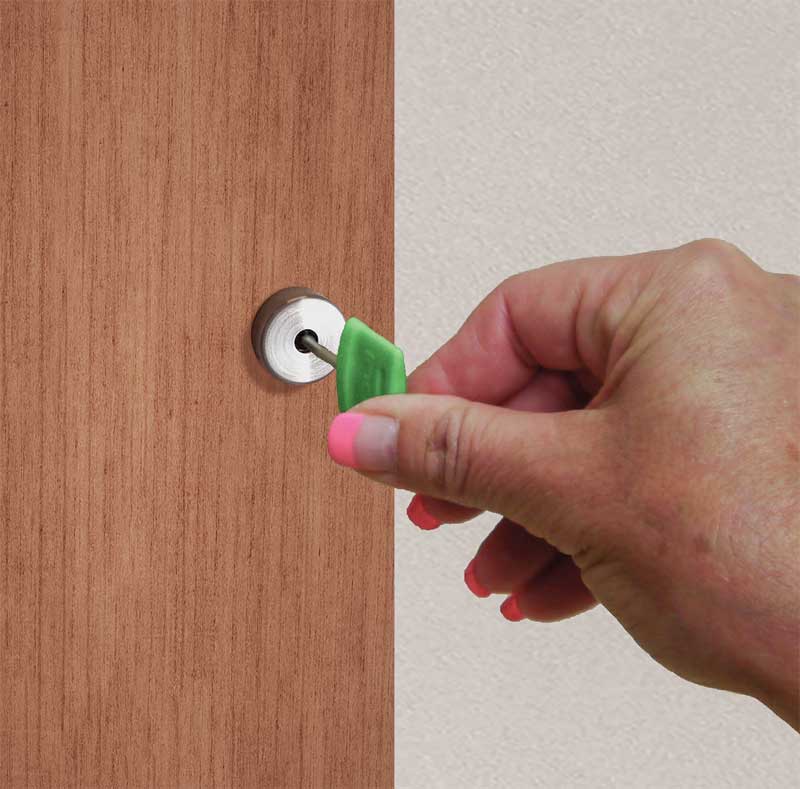
Install the lock through the 25-mm lock bore on the wall. The spindle hub should be at the centre of the trim bore. Next, use a spindle or screwdriver to test the bolt retraction. Use two wood screws to secure the lock body to the stud and mount the trim. Then use the thumb-turn connected to the spindle to test movement of the lock bolt and make any adjustments necessary. Finally, fasten the provided trim screws (Figure 5).
Step 4: Add the emergency release
To install the emergency release, re-hang the barn door in the fully closed position. Throw the lock bolt and mark the exact position of the strike centre, which must be at least 25 mm from the edge of the door. Using this mark as the guide, drill a pilot hole through the door with a 3-mm (1/8-in.) bit. Now use the pilot hole to guide a 25-mm diameter hole saw and drill a 32-mm (1 ¼-in.) deep hole. Do not drill through the door. Install the strike and secure it with emergency release screws. Finally, install the decorative cap over the release screw.
Step 5: Trim with accessibility in mind
Privacy locks for barn doors come in different styles and finishes. Some are flush and discreet; others are designed to comply with accessibility standards for commercial and hospitality applications. Choose the trim best suited to the project’s needs and esthetics, bearing in mind CSA B651 regulations mandating a clear width of 810 mm (32 in.) for the door, with the hardware installed 900 to 1100 mm (35 to 43 in.) above the floor.
By following the steps outlined above, door hardware installers can transform a beautiful and trend-setting door into a truly functional privacy solution.
 Qianyan Cheng is the co-founder of INOX hardware. Her manufacturing and industrial design expertise comes from more than 20 years of work in the hardware and lock industry in Europe, Asia, and America. Cheng can be reached at qcheng@unisonhardware.com.
Sign up for our weekly newsletter
Construction Canada weekly newsletters give the latest AEC industry news for those who build, design, engineer, specify, renovate or operate in the built environment.
Related Products & Services
Read the Latest Issue
