The thin alternative to traditional masonry

By Mark D. Hagel, PhD, P.Eng.
Brick and stone masonry can create timeless buildings. Although they have been used for centuries for their esthetics, durability, and fire resistance, the full-bed veneer version of these materials requires a fairly robust structure for support. This is not always feasible on modern lightweight structures with smaller footings or lighter floor and roof framing. As stone and brick manufacturing methods improved, lighter thin versions of natural stone and brick—as well as concrete replicates of stone—began entering the market in the 1960s.1
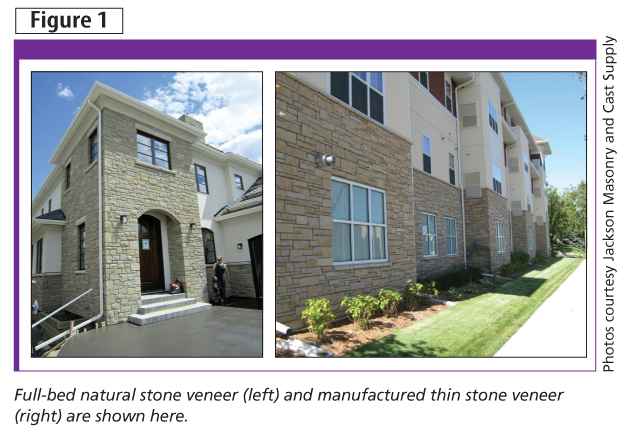
Adhered thin stone and brick veneers have gained popularity in the past 15 years because of their ability to replicate the look and feel of full-bed masonry with increased installation speed, a reduction in wall thickness, and without the additional weight of traditional full-bed masonry. Indeed, it is often difficult for the casual eye to differentiate between full-bed and adhered, or manufactured and natural stone veneers (Figure 1).
In 2013, Masonry Veneer Manufacturers Association (MVMA) joined the National Concrete Masonry Association (NCMA); its products are now recognized as concrete masonry products. In August, two ASTM standards for adhered manufactured stone masonry veneer (AMSMV) were developed to standardize this type of cladding. ASTM C1780–13, Standard Practice for Installation Methods for Adhered Manufactured Stone Masonry Veneer, offers guidance on accepted procedures for installation of adhered manufactured stone units. ASTM C1670–13, Standard Specification for Adhered Manufactured Stone Masonry Veneer Units, on the other hand, provides minimal product requirements for manufactured stone units.
 With the November 2011 publication of the National Energy Code for Buildings (NECB) in Canada, many of the thin masonry veneer products are now being installed over exterior rigid or semi-rigid insulation. Exterior insulation provides a thermal break between the wall studs, sheathing, and veneer. It also reduces thermal bridging not decreased by insulation in the stud cavity insulation alone. The need to maintain an acceptable wall thickness with an increase in the exterior insulation’s size has also made adhered masonry veneers a popular alternative to full-bed masonry as these claddings still capture the non-combustible properties and look, but can reduce the veneer thickness by several inches.
Many adhered masonry manufacturers have installation guides. The Canadian Standards Association (CSA) also has prescriptive requirements for adhered masonry veneers in Annex A of the, CSA A371–2004, Masonry Construction for Buildings. This standard can be applied to thin masonry veneer products individually secured by mortar adhesion (i.e. adhered masonry veneers) that conform to the prescriptive requirements on unit size restrictions and installation. However, a definitive standard specific to adhered masonry veneers has yet to be developed for Canada and a more detailed discussion on applicable requirements is beyond the scope of this article.
 This article reviews types of thin masonry products, typical wall compositions, details, and good design practices for materials installed on stud and sheathed wall systems. The details and design recommendations are based on information obtained from installation guides, including MVMA’s Installation Guide for Adhered Concrete Masonry Veneer, and Building Stone Institute’s (BSI’s) Adhered Natural Stone Veneer Installation Guide.
Types of adhered masonry veneer units
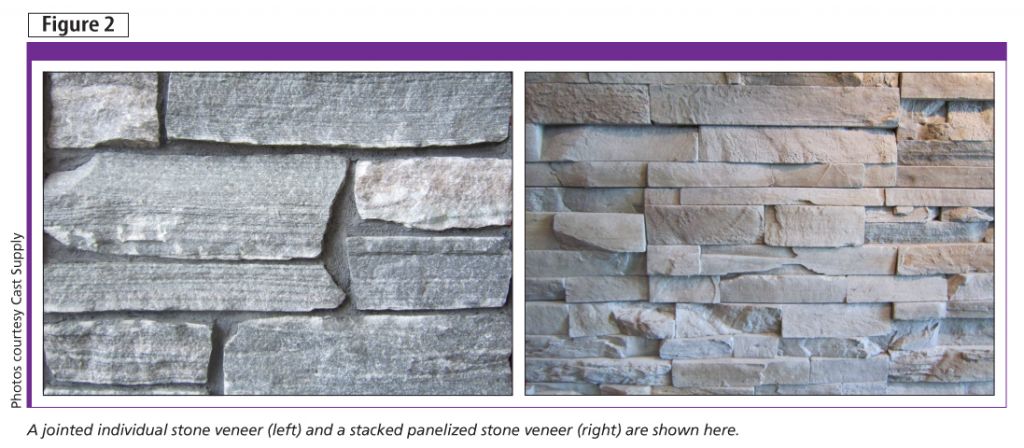
As the terminology of the thin stone veneer industry evolves, two classifications have recently been adopted for ‘individual’ and ‘panelized’ stone units.
Individual stones are typically surrounded by visible mortar joints while panelized units should be installed with small thin joints giving the appearance of a dry-stacked stone veneer (Figure 2). The small mortar joints in panelized stone veneers are important as they provide movement, increase the cladding system’s bond, and improve resistance to moisture ingress. In the past, these types of stone installations have been referred to as ‘jointed’ and ‘stacked’ stone veneer, respectively.
 Either type of unit can be a manufactured unit or natural stone. The formers uses a lightweight concrete aggregate and typically weighs 0.38 to 0.72 kPa (8 to 15 psf) depending on the stone’s thickness. Natural stone typically weighs between 0.72 to 1.40 kPa (15 and 29 psf) depending on the type (e.g. limestone, sandstone, granite, or marble) and thickness of the unit.
Another type of thin masonry veneer is thin brick. Thin bricks are manufactured by cutting a solid brick into three 12.7-mm (½-in.) slices, or extruding 12.7-mm slices and then firing them.
Adhered stone veneers
As adhered masonry veneers have evolved, the technology and understanding has improved. The use of thin adhered veneers can be categorized by masonry trim, walls under 3 m (10 ft), and walls greater than 3 m.
Base, corner, and column details less than 3 m above grade
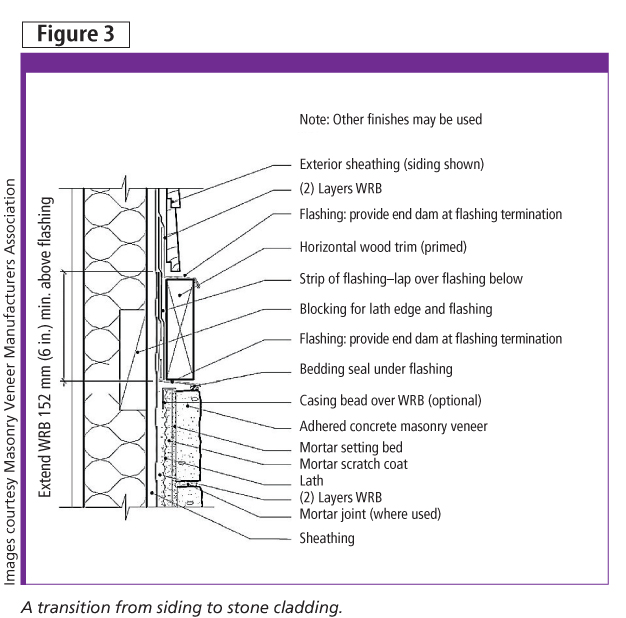
There are many details to illustrate the installation of thin stone as 1.2-m (4-ft) trim on buildings or to highlight columns or corner features. Figure 3 illustrates a detail for transition from siding to stone base detail. In the detail, there are no provisions for drainage behind either the siding or the stone cladding.
 When properly flashed, there is typically little risk of water penetrating behind the stone. Therefore, drainage may be unnecessary unless local building codes require it, or there is drainage on the cladding above the stone feature. An effective design uses one layer of Grade D 30 minute building paper installed over one layer of building wrap. The building paper acts as a mortar break, and protects the building wrap from contact with the mortar that can adhere to it.
Full height walls less than 3 m above grade
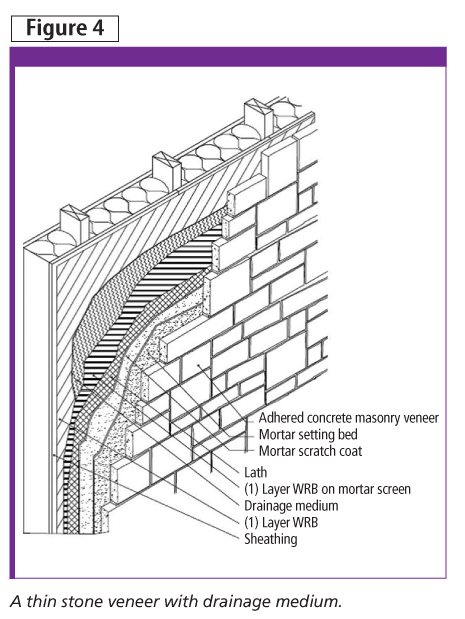
With full-height walls that do not exceed 3 m (10 ft) above grade, it is typically prudent to provide drainage behind the adhered masonry veneer, even when local building codes do not require it. Full-height walls usually have openings for doors and windows, as well as penetrations in the envelope for services that can be potential sources of water ingress behind the cladding.
 Drainage can be provided in many ways. The most popular is a drainage mat or vinyl/treated wood strapping. If drainage mats are used, it is important the product is sufficiently incompressible to prevent excessive deflection of the lath and scratch coat. Excessive deflection can cause joint cracking and de-bonding of the adhered units.2 Figure 4 provides an isometric with a drainage mat behind the lath used for anchoring the masonry veneer.
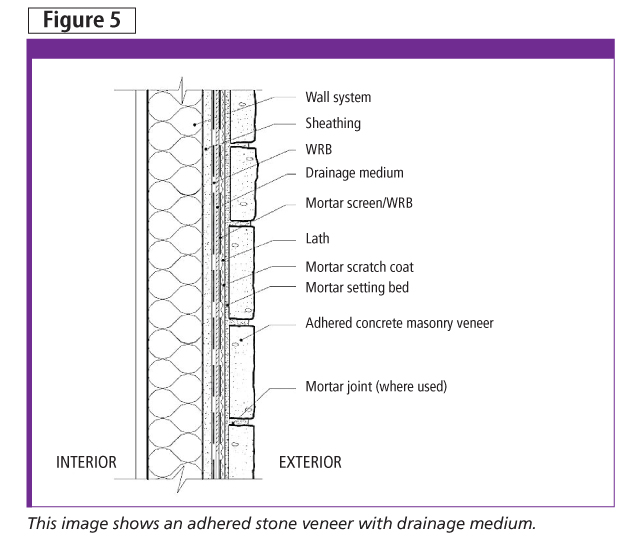
When there is concern with the veneer’s ability to bond to the lath, high-performance stone veneer mortar products can be used. Many of these products have twice the shear and tensile strength of the traditional Type N and Type S mortars typically used in full-bed masonry veneers. Often the manufacturer of the stone product has installation recommendations regrding the type of mortar to use and whether the addition of a bonding agent or a high-performance mortar should be considered. A cross-section detail illustrating adhered stone veneer with drainage medium is shown in Figure 5.
Full-height walls exceeding 3 m above grade
With full-height walls that exceed more than 3 m (10 ft) above grade, it is prudent to have the veneer system designed and stamped by an engineer certified to practise in the local area. As with walls less than 3 m above grade, it is a good idea to provide for drainage behind the adhered masonry veneer.
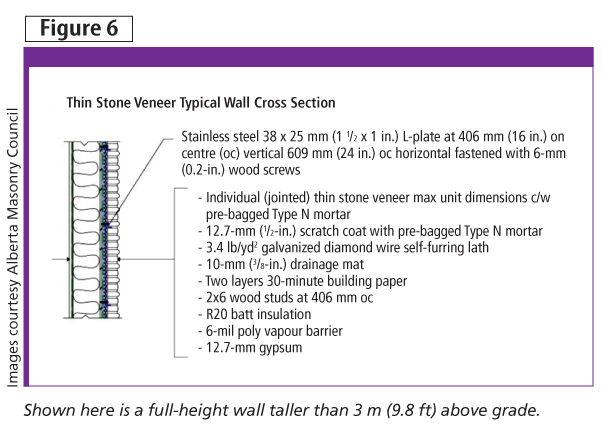
 When individual stone units are being installed and can be well-jointed, use of Type N or Type S mortar often suffices. Additional mechanical anchorage can be provided using a small L-shaped steel plate. A small shelf angle may also be used to provide additional support at the foundation and floor levels depending on the wall height. Figure 6 illustrates a typical wall section with additional mechanical anchorage.
If panelized (i.e. stacked) stone units are being installed, the small joints are typically not sufficient in size and mechanical anchorage is likely impractical. The use of high performance mortars is probably a good idea due to the increased risk should a stone de-bond and fall from greater height.
A stone veneer mortar with twice the Type S shear and tensile bond strength can be used with manufactured stone units whose back surfaces are typically roughened during casting to provide additional bond to the lath and scratch coat. For natural stone panel units whose bonding surfaces are often smooth, the use of polymer-modified stone veneer mortar products may be used. These provide up to 10 times the shear and tensile strength of Type S mortar. It is important to note polymer-modified mortars may be too strong for manufactured stone units, and may crack the units during shrinkage events.
 Adhered stone installed over exterior insulation
With the increase in performance requirements by the NECB adhered masonry veneer products are being installed over 76 mm (3 in.) of rigid or semi-rigid insulation. BSI’s Adhered Natural Stone Veneer Installation Guide does not recommend installation of stone directly over rigid insulation if the wall construction is open stud (i.e. there is no exterior sheathing) as even rigid insulation is too flexible to provide the necessary support for the adhered stone veneer.
Several methods have been explored to achieve drainage, sufficient anchorage, and support for adhered masonry veneers installed over insulation. If the insulation thickness is 25 mm (1 in.) or less, the lath and veneer can be installed directly over the insulation as depicted in the cultured stone detail and MVM’s Installation Guide for Adhered Concrete Masonry Veneer.
However, if the insulation depth exceeds 25 mm, alternative methods are recommended due to the cantilevering of the stone. Two methods are explored.
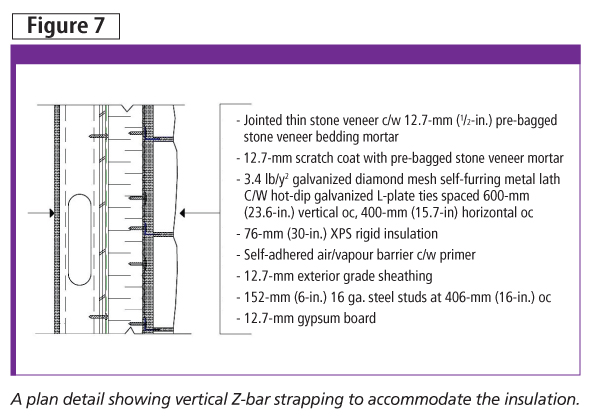
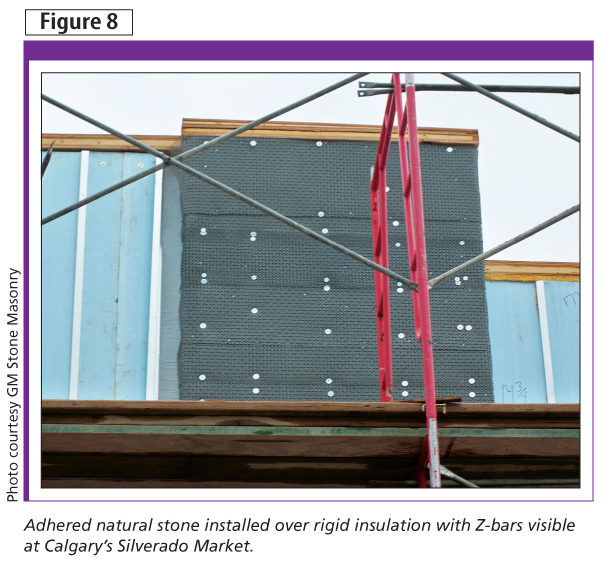
The first method uses vertical Z-bar strapping to accommodate the insulation (Figure 7). However, this can create thermal bridges and the insulation typically has to be manually cut to fit between the Z-bars. The studs are typically spaced 406 mm (16 in.) on centre (oc) horizontally while rigid insulation typically comes in 610 x 1219-mm (24 x 48-in.) sheets requiring labour-intensive and time-consuming cutting. As an alternative to rigid insulation, semi-rigid insulation may facilitate installation of the insulation depending on the insulation requirements. (Figure 8 illustrates this detail in practice on a commercial retain unit [CRU] in Calgary.)
An alternate method supports the veneer at the base with a shelf-angle or brick ledge and anchors the lath over the rigid insulation with long fasteners (Figure 9). A drainage mat can be used behind the lath or the use of channelled insulation can provide for drainage and eliminate the drainage mat. Issues with this method can result from the long fasteners that must be robust to resist the cantilevering of the stone veneer and can be expensive. Also, the length of the fasteners can make it more difficult to engage a stud. If the fastener is installed at even slight angles it may miss the stud by the time the fastener has travelled 76 mm (3 in.) through the insulation. As with the Z-bar method, a thermal bridge between the stud and the fastener can be created, but with less thermal mass than a Z-bar.
Both systems typically require engineering of the fasteners and/or Z-bars to ensure the cantilevered stone is adequately supported. 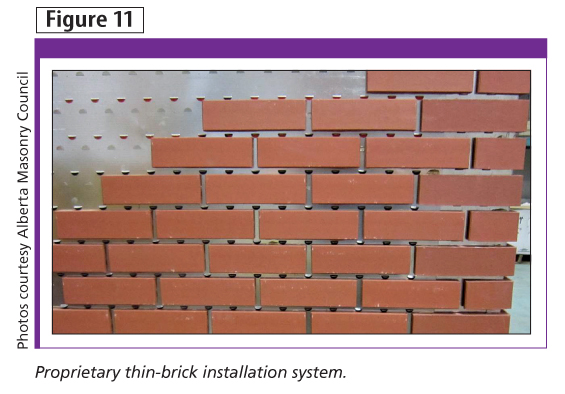
Adhered thin brick veneers
In the past, thin brick has often been used in interior applications. However, similar to adhered thin stone, the material has also been gaining popularity as a cladding material. With the increases to exterior insulation required for better thermal performance, thin brick can reduce wall thickness while still providing the non-combustible cladding properties and look of authentic full brick.
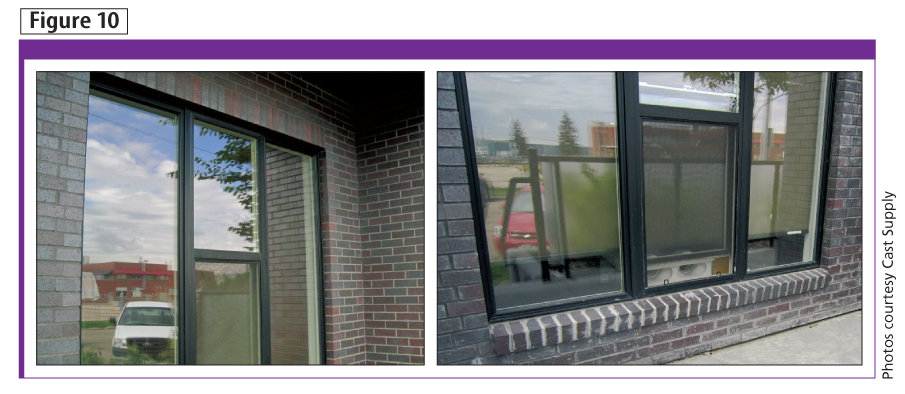
One such project in Edmonton used thin brick installed over 76 mm (3 in.) of insulation on a condominium. The mason installed the thin brick on this project using traditional bricklaying techniques of buttering the head joints of each unit in order to maintain a consistent joint thickness and traditional brick esthetic. The clever use of prefabricated thin brick corners by the mason created the illusion of full-brick window sills and eliminated the need for loose laid shelf angles above windows and doors typically found on full-bed masonry veneer window details (Figure 10).
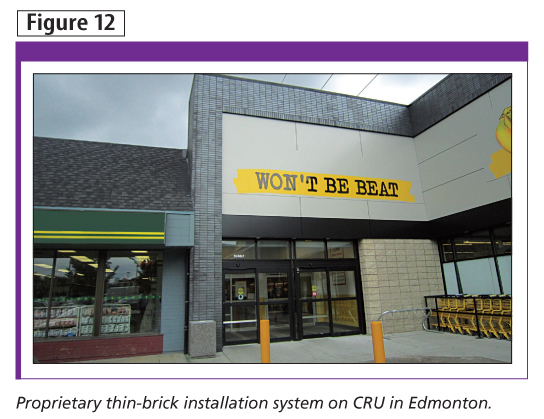 There are also proprietary systems using clips punched into galvanized metal sheets to anchor the thin brick in place. These products can make it quick and easier for the installer to provide a consistent joint width, and a plumb and true esthetic (Figure 11). Once the brick have been installed into the system, the joints are grouted with a grout bag and tooled. A project used this system to renovate an existing building in Edmonton (Figure 12).
Conclusion
Adhered masonry veneers can replicate the look and feel of full-bed masonry with faster installation and without the additional weight. There are several resources for the design and installation of these versatile products. The ability of these claddings to provide high thermal performance wall systems and esthetically pleasing architecture will ensure adhered masonry veneers remain a popular cladding.
Notes
1 For more information, visit www.culturedstone.ca/about.aspx. (back to top)
2 Sufficient data on the causes of cracking and de-bonding of adhered masonry veneers in the Canadian environment could not be found to confirm with certainty the causes of cracking and de-bonding. (back to top)
 Mark D. Hagel, PhD, P.Eng., is the executive director of the Alberta Masonry Council. He holds bachelor’s degrees in actuarial science/applied mathematics and civil engineering, and a doctorate in civil engineering. Hagel was previously employed as a technical services engineer for the Canadian Concrete Masonry Producers Association (CCMPA) and a building envelope engineer and structural engineer with the Calgary office of Halcrow Yolles. Hagel can be reached via e-mail at markhagel@albertamasonrycouncil.ca.
Sign up for our weekly newsletter
Construction Canada weekly newsletters give the latest AEC industry news for those who build, design, engineer, specify, renovate or operate in the built environment.
Products & Services


Read the Latest Issue