Better floor performance starts with a solid subfloor system
By Cory McCambridge
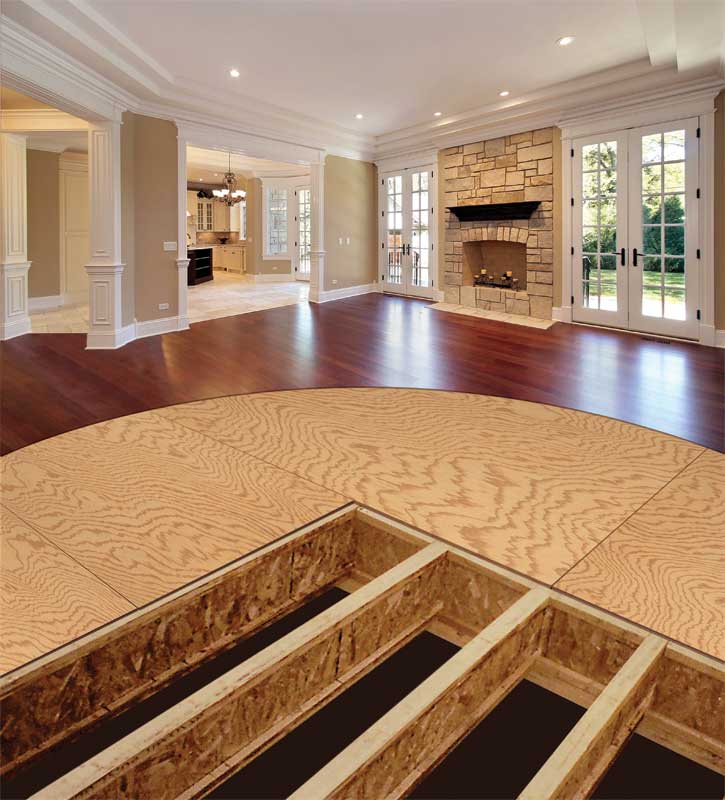
Beautiful hardwood floors are an investment expected to last a lifetime. To ensure the best long-term performance and appearance, careful attention must be paid to subfloor installation and the mitigation of moisture risks.
Proper installation starts with specifying the right subfloor materials. A variety of floor framing and wood structural panel products can be used in floor construction. To select the appropriate products and floor design, it is important to consider the predicted loads, structural requirements, and compatibility with the finished floor requirements.
Quality through and through
In residential projects, hardwood flooring is most commonly installed over a single layer of tongue-and-groove combined subfloor-underlayment or sheathing-grade panels. Plywood and oriented strand board (OSB) panels certified by APA-The Engineered Wood Association are manufactured to meet performance criteria for specific construction applications. OSB panels are manufactured in conformance with the Canadian Standards Association (CSA) O325, Construction Sheathing. Plywood panels are certified to CSA O151, Canadian Softwood Plywood, CSA O121, Douglas-Fir Plywood, or CSA O153, Aspen/Poplar Plywood. Section 9.23.15.5 of the National Building Code of Canada (NBC) specifies minimum panel thicknesses for these products at common joist spacing.
Span rating
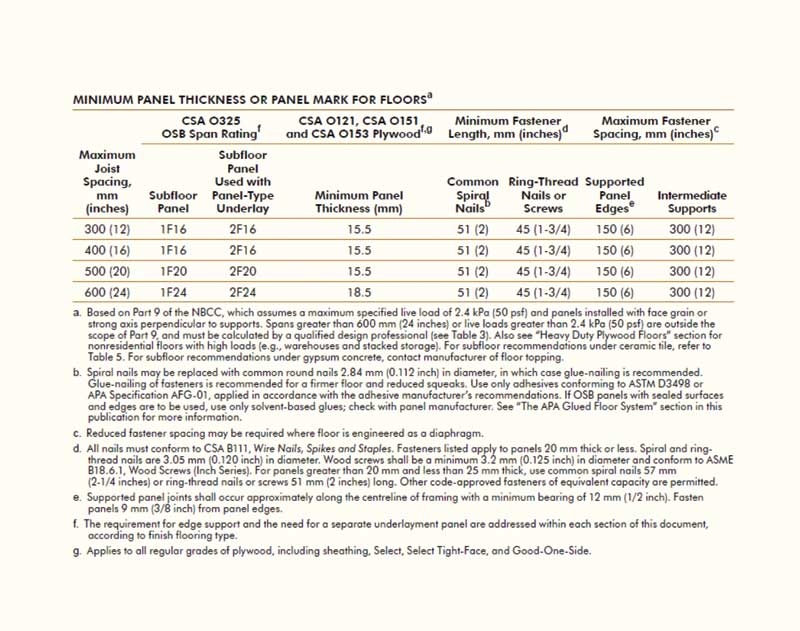
Panels certified to CSA O325 are manufactured with span ratings of 406, 508, 610, 813, and 1219 mm (16, 20, 24, 32, and 48 in.). Some manufacturers may offer panels with similar thicknesses but different span ratings, so it is important to specify the panel thickness as well as its span rating. The Canadian portion of the APA trademark indicates the product span rating for roof applications (R) as well as floor applications (F). To determine if the panel can be used at its maximum rated span without requiring edge support or a layer of underlayment it is important to note the numbers preceding the letter(s) ‘F’ or ‘R’. If a number 1 is present, the panel may be used at its maximum rated span without requiring edge support or a layer of underlayment. If a number 2 is present, the panel will require edge support or a layer of underlayment at its maximum rated span. It is important to note all subfloor panels should be installed continuous over two or more supports with the strength axis perpendicular to supporting members. Failure to do so can lead to soft spots, uneven appearance, buckling, or squeaks. For more information on Canadian plywood recommendations, please read APA’s R300 publication, Engineered Wood Floor Systems: Construction Guide for Canada.
For improved stiffness and to help eliminate floor squeaks when hardwood flooring is installed, spans reduced from the maximum are advisable. The use of 19/32, 5/8, or thicker performance category wood structural panels (WSPs) as a subfloor material when joists are spaced at 406 mm on center (o.c.) is also recommended. For wider spacing, thicker panels should be used (Figure 1).
Glued floor system for solid performance
The APA glued floor system is based on thoroughly tested gluing techniques and field-applied construction adhesives that firmly and permanently secure a layer of WSPs to supporting members. This increased bond between the subfloor and its supporting members improves floor stiffness and overall performance by helping to reduce squeaks, floor vibration, bounce, and nail-pops. Floor performance can be enhanced further by gluing tongue-and-groove joints.
Following these eight steps during the installation of a glued-floor system will result in the best results:
- Snap a chalk line across joists 1.2 m (4 ft) in from wall for panel edge alignment and as a boundary for spreading glue.
- Spread only enough glue to lay one or two panels at a time or follow specific recommendations of glue manufacturer. Wipe away any water, dust, and debris from joist surface before gluing.
- Apply a continuous line of glue about 6 mm (1/4 in.) in diameter to framing members. Use a serpentine pattern for wider areas.
- Apply two lines of glue on joists where panel ends butt to ensure proper gluing of each panel end.
- After first row of panels is in place, spread glue in groove of one or two panels at a time before laying next row. Glue line may be continuous or spaced, but avoid squeeze-out by applying a thinner line than on joists, about 3 mm (1/8 in.) in diameter.
- Tap the second row of panels into place using a block to protect groove edges. Do not force panels together beyond the point of the tongue contacting the end of the groove.
- Stagger end joints in each succeeding row, where possible. A 3-mm space is recommended between panels at end joints and along edge joints in non- tongue-and-groove panels.
- Complete all nailing of each panel before glue sets by standing on the panel over the joist next to the nailing point to ensure a tight connection. Panels might deflect if weight is placed between joists and may not be securely fastened to supporting members. Check the glue manufacturer’s recommendations for allowable open time and be sure to pay attention to any restrictions for cold or hot weather.
Sign up for our weekly newsletter
Construction Canada weekly newsletters give the latest AEC industry news for those who build, design, engineer, specify, renovate or operate in the built environment.
Products & Services


Read the Latest Issue